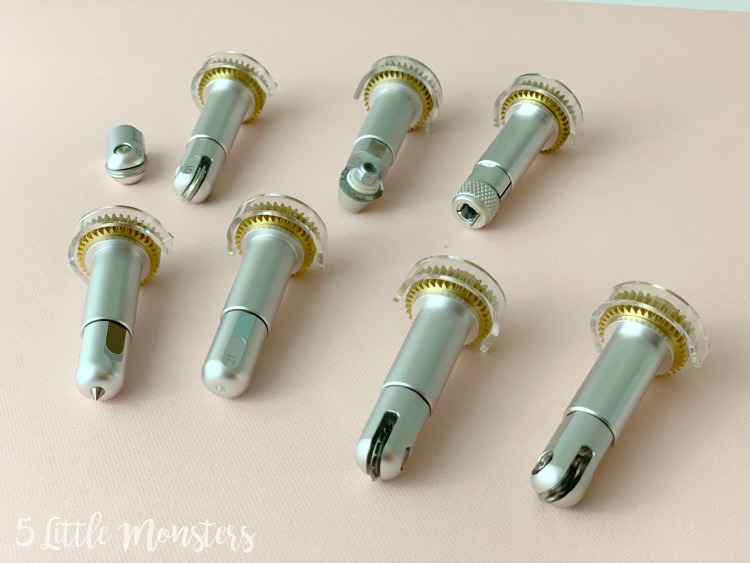
Cricut recently came out with 4 new tools for the Cricut Maker and I just got them a few days ago and had the opportunity to try them out. All 4 tools are part of the adaptive tool set that works only with the Cricut Maker. There is the Basic Perforation Blade, the Wavy Blade, the Fine Debossing Tip, and the Engraving Tip.
All 4 of these tools use the QuickSwap Housing, just like the scoring wheels that were released last year. This makes it a little less expensive to buy the tools because you actually only need to buy one of those 5 (or 6 if you count both scoring wheels) in the housing and the others you only need the tips. Then you can just push the button on the top to switch out the tips. That saves you about $20 per blade/tip, so it is a pretty great option.
(I ordered all of them in the housing for pictures but it is not necessary or what I would recommend, why not save some money?)
 One thing to note though is that the rotary and knife blades do not use the QuickSwap Housing, they each have their own housing. That means if you only have a rotary blade and want to buy one of the new ones you would need the housing, but after that any other you purchase you would only need the tip.
All of the tips do pretty cool stuff but the one I was probably most excited about was the perforation blade, so that is the main blade I used in this project. It makes really quick and easy perforated cuts that are perfect for anytime you need something that can be torn easily, like tear out pages (in a coupon book perhaps), or tickets. I think there are a lot of fun ways you could use this blade.
I also use the wavy blade, just to add a decorative element to my coupon book. This blade can be used on a variety of materials to quickly and easily give a decorative edge to your design. The design will still show a straight edge on the screen but when you cut it with the wavy blade it cuts with a wavy edge.
I haven't tried the other two tips yet, but I'm sure I will share projects using those soon. The debossing tip is great for adding cool designs to paper, basswood, and more. The engraving tip looks pretty neat. You can engrave metal or acrylic sheets to make really neat decorative pieces.
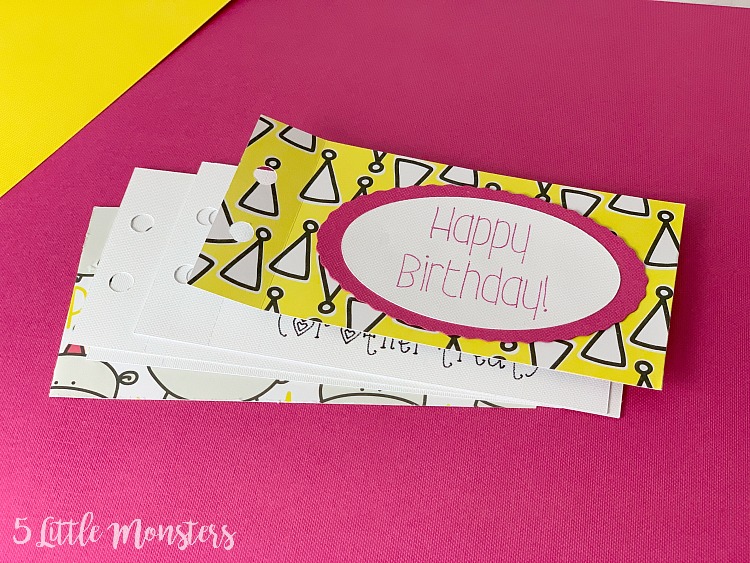
Like I said, I decided to use the perforation blade and the wavy blade to make a Happy Birthday Coupon Book. I made it with a kid in mind, specifically my daughter who has a birthday in just a few days. But, you could obviously change it out to work for any holiday or special occasion and customize the coupons to fit your needs.
 I first made a simple cover using cute paper from Rad & Happy, then layered a couple of ovals on the front, cutting one with the wavy blade and writing Happy Birthday on the other. You could change the words to work for any occasion.
You could make as many or as few coupons as you would like, and change up the wording to make them for anything. I chose 4 things that I thought my daughter would be excited about. She loves one on one time, I guess that comes with being one of six kids, you don't get a lot so it is extra special.
Knowing that I chose a date with mom, and a date with dad for two of the coupon items. I also added a craft night because she loves to get into my craft supplies and make stuff so I thought she would like a night of crafting with me, especially if she gets to pick the project. Then last I added a coupon for ice cream, or a treat of her choice.
There are tons of of things you could make coupons for and obviously they will be different depending on the child if you make it for a child, or if you make it for a spouse or significant other, a parent, a grandparent, etc.
You can easily change up the text on the coupons to meet your needs, and I included a blank coupon that you can add your own text to.
How to Make a Birthday Coupon Book
You will need:
- Cricut Maker
- Scoring Wheel or Scoring Tool
- Perforation Blade
- Wavy Blade
- Cardstock in desired colors (I used Cricut Cardstock in white and fuchsia, and the party hat/hippo paper from Rad & Happy Endless Imagination)
- Cricut Pens in desired colors (I used a pink glitter gel for the cover, and black for the coupons)
- glue stick or tape roller
- ribbon or embroidery floss
Instructions:
First open the Birthday Coupon Book Design Space File.
If there is any text that you want to change do that first. To change the text you will first need to detach from the shape it is on. Then make any changes to the words or fonts. Resize as needed to fit on the shape it will be on. Attach the words to the shape you want them written on.
As you make changes to your words keep in mind that there are lots of writing fonts available in Design Space. I used a different font for each coupon, but you can change them to whatever you want. All of the fonts I used are available free with Cricut Access.
The dashed lines on the 2 cover pieces (green) are score lines, the dashed lines on the coupons (white) are perforation lines. The pink oval looks like a normal oval but the linetype is set to wavy so it will ask for the wavy blade and cut it out with a wavy edge.
Follow the prompts on the cut screen to cut out your design. It will tell you which blade to put in and which color of pen.
Once all of your pieces are cut, assemble the layer on the front cover by gluing the white oval with the words, onto the wavy pink oval, then glue that onto the front cover centering it between the score line and the right edge.
Next layer all of your pages in the order you want them, lining up the holes on the side. Back cover on the bottom, then all of your coupons, and finally the front cover on the top.
Tie a ribbon or embroidery floss through the holes on the side. Ribbon will probably work a little better because it is thicker, but I didn't have any in the right color so I used embroidery floss and it worked fine too.
Now it is ready to be gifted, and when the recipient is ready to redeem a coupon they just need to tear it out along the perforation and turn it in.


No comments :
Post a Comment